On the market, you can find a lot of different guitars of different designs. However, if you want something special or are not satisfied with the previous one, you can create your own one and paint your electric or any other guitar.
There are many reasons why people may want to repaint their guitar. Maybe someone wants to cover up damage or wear and tear, just refinish the guitar body. Others are not happy with the original paint job, or maybe they want to change the color of their guitar to match their style. For many people, painting a guitar is a way to show their personality and style. It can be a fun and creative way to make your instrument unique.

Tools needed for a guitar repainting project
Let’s begin by saying that you’ll need to sand down the guitar’s surface to prepare it for painting. This step is essential because it will help the new paint adhere to the guitar better. You can use medium-grit sandpaper and sand in the grain direction.
You’ll also need to use a primer before painting, which will again help the paint stick to the guitar and provide an excellent, even base for the new color.
Once you’ve sanded and primed the guitar, you can start painting. Choose a color you like that will complement the rest of your band’s equipment and stage show. You may want to consider using multiple colors or even a design on your guitar. When choosing a piece of paint for your guitar, it’s essential to pick one that is made specifically for use on musical instruments. This type of paint will be able to withstand the wear and tear that guitars are subjected to. You’ll also need to ensure that the paint you choose is suitable for the type of finish you want on your guitar. For instance, if you want a glossy finish, you’ll need to use a different type of paint than if you want a matte finish.
Besides, you may need:
- Sandpaper.
- Primer.
- Color paint.
- Clear coat finish.
- Polishing compound.
- Ruler or a straight edge.
- Soft cloths.
- Screwer and screws.
- Safety goggles.
- Dust mask.
- Painter’s respirator (optional).
- Work gloves (optional).
- Heat gun (optional).

Steps for a guitar repainting project
Disassemble your guitar
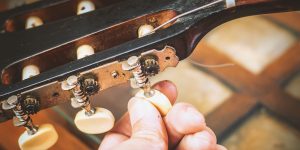
You should begin your guitar repainting project with dissembling. The process of disassembling a guitar before painting is relatively simple, but there are a few things to remember. The first step is to remove all of the strings. It will make it easier to work on the guitar and avoid damaging the paint job.
Besides, you will need to remove all the guitar hardware. It includes the pickups, bridge, tuning keys, and other hardware attached to the guitar. Once the hardware is removed, you can then remove the pickguard (if your guitar has one) and any other removable parts.
Finally, use a screwdriver to remove the screws holding the guitar’s neck. Once the neck is removed, you will be able to access the inside of the guitar.
Removing an old paint
You can do it in a few ways. First, you can use a chemical stripper, sandpaper, or heat gun. For instance, use a paint stripper. It will require you to sand down the guitar after the paint stripper has been applied in order to remove any residue. If you decide to use a chemical stripper, follow the instructions carefully and always wear gloves and protective eyewear.
One more way is to sand the guitar down completely. This method will take more time, but it will ensure that all the old paint is completely removed.
If you use a heat gun, be careful not to damage the wood beneath the paint. Set the heat gun to a low setting and hold it about six inches from the guitar body. Slowly move the heat gun back and forth over the area you want to strip. The paint should start to blister and peel away.
Once you have removed the old paint, you must sand the guitar’s surface before repainting it.
Use a primer
A primer is a material that helps fill in the wood’s pores and create a smooth surface. It can be applied before painting or staining and will help to improve the appearance of the finished project. When choosing a primer, it is essential to select one that is compatible with the paint or stain that will be used. Primers are available in both water-based and oil-based formulas.
To apply a primer to the guitar before painting, wipe down the surface with a tack cloth to remove dust after sanding. Then, apply the primer with a brush or roller, working in small sections. Once the primer is dry, lightly sand it lightly with fine-grit sandpaper and wipe down the surface with a tack cloth.
Paint a guitar
There is no one definitive way to paint a guitar. One thing to keep in mind is that paint can damage your guitar’s finish. If you’re not careful, you could end up ruining the instrument. So be sure to test any paint or other material on a small area of the guitar first to ensure it won’t damage the finish.
When painting a guitar, always use a light touch. Heavy-handedness can easily lead to smudging or other damage. Be sure to use thin, even coats of paint and allow each coat to dry completely before applying the next one.
Some people use stencils or templates to get clean lines, while others freehand their designs. You can also use decals or stickers to create exciting patterns or images on your guitar.

Apply a clear coat
A clear coat is a type of finish typically applied over paint or stain on a guitar. It protects from wear and tear, UV rays, and other environmental factors. Clear coats can be water- or oil-based, and each has its own pros and cons. Water-based clear coats are easier to apply and remove but can also be more susceptible to yellowing over time. Oil-based clear coats provide better protection against wear and tear but can be challenging to apply and remove.
When choosing a clear coat for your guitar, you must consider the type of finish you are using underneath. For example, if you use water-based paint or stain, you will need a water-based clear coat. If you are using oil-based paint or stain, you will need to use an oil-based clear coat.
Clear coats can be applied with a brush, roller, or spray gun. When using a brush or roller, it is essential to work in small sections so that the clear coat does not dry too quickly and cause streaks. When using a spray gun, it is essential to hold the gun consistently from the guitar’s surface so that the clear coat is evenly applied.
Polish a guitar
To achieve a high-gloss finish on your guitar, you will need to put in some extra effort after applying the clear coat. The easiest way to do this is to use a power buffer with a polishing compound specifically designed for use on clear coats. You can also hand-polish the finish using a soft cloth and a small amount of polishing compound.
Suppose you are not satisfied with the results of your initial polishing efforts. In that case, you may need to wet-sand the finish using increasingly fine grit sandpaper until you achieve the desired results. It is a more time-consuming process, but it will give you a perfect high-gloss finish if done correctly.
After applying the clear coat, it is essential to allow it to dry completely before moving on to the next step. Depending on the type of clear coat you are using, this could take anywhere from a few hours to a day.
Assemble a guitar
Begin by attaching the neck of the guitar to the body. Screws typically do it. Then, you will need to attach the fretboard to the neck of the guitar and other components except for the pickguard. Once they are attached, you need to install the strings onto the guitar. Start by threading the string through the hole in the guitar’s body and then tying it off at the tuning peg.
After the strings are installed, you will need to tune the guitar. It can be done by ear or by using a guitar tuner. Finally, you must attach the pickguard to the guitar’s body. Again, it is usually done with screws or nails, although some guitar kits may use other fasteners.
We are supported by our audience. When you purchase through links on our site, we may earn an affiliate commission at no extra cost to you.

 Best Guitar For Punk Rock Reviews
 Best Worship Guitar Reviews
 Best Guitars Designed For Women
 Best Country Guitars Reviews
 Best Acoustic Guitar For Blues
 Martin LX1 Review
 Does Hand Size Affect Guitar Playing?
 Are Smaller Guitars Easier to Learn on?
 What Scale Is Most Used in Blues?
 How Long Can Guitar Strings Last?
 How to Take Care of an Acoustic Guitar
 What Is The Bridge On a Guitar
Our newsletter
* We will never send you spam or share your email with third parties